Basic Implementation of Long Polling in PHP

Web applications were originally developed around a client/server model, where the Web client is always the initiator of transactions, requesting data from the server. Thus, there was no mechanism for the server to independently send data to the client without the client making a initial request. To overcome this deficiency, Web app developers can implement a technique called HTTP long polling, where the client polls the server requesting new information. The server holds the request open until new data is available. Once available, the server responds and sends the new information. When the client receives the new information, it immediately sends another request, and the operation is repeated. This effectively emulates a server push feature, which is an important part of Reverse AJAX.

A very simple demonstration of long-polling with AJAX (jQuery) and PHP. Long-polling makes near “real-time” applications possible. The client does not request new data every X seconds/minutes, the client gets new data delivered when there is new data (push-notification style). The major difference between long and short polling is that short polling sends a request to the server, get an instant answer. Do this every x seconds, minutes etc. to keep your application up-to-date. But, This costs a lot of requests. where as in long polling, a request to the server, keep the connection open, get an answer when there’s “data” for you. This will cost you only one request (per user), but the request keeps a permanent connection between client and server up.

You can download coding zip from from here #link.

In this coding sample, if you want to test this process all you need to do is, unzip this folder and place it under your web server. Here .htaccess file is used to support cross domain request. Client side has js which sends an AJAX request to server and checks on real time mode whether data.txt file is having any content changes or not. If it is yes then it will display into client side immediately in a fraction of section(gives you a feel of real time). You can implement this kind of process on your real time chat like functionality.

In order to understand it in better way, you can check this complete process under your local machine web server using firebug addon in mozilla browser. You can see the image below:-

I hope this helps! 🙂

Amazing Reverse AJAX!!!

AJAX (Asynchronous JavaScript and XML) Group of interrelated Web development techniques used on the client-side to create asynchronous Web applications. With AJAX, Web applications can send data to, and retrieve data from a server asynchronously without the need for a page reload.Though the name includes XML, nearly anything can be transferred with an Ajax request. The most commonly used data is JSON (JavaScript Object Notation), which is close to JavaScript syntax and consumes less bandwidth. AJAX requests are stateless by default, and can only be opened from the client to the server.

Reverse AJAX Techniques: libraries and support in 2014. Reverse AJAX is essentially a concept for sending data from the server to the client. It can be simulated with a repeated AJAX request from client – simple polling, piggyback polling. Comet, term for various techniques for Reverse AJAX. Server can send events to the client without the client specifically requesting it.

Major Reverse AJAX Basic polling techniques:-
1. Reverse AJAX as simple polling: This is a basic AJAX with regular interval requests almost every few seconds. In order to get the server events as soon as possible, the polling/request interval must be as low as possible. If interval is reduced, the client will issue many more requests, many of which won’t return any useful data, and will consume bandwidth and processing resources for nothing. It’s really easy to implement and does not require any special features on the server side. It also works in all browsers
2. Reverse AJAX as Piggyback Polling: Piggyback polling removes all redundant requests (which return no data). There is no interval. Requests are sent when the client needs to send a request to the server. The difference lies in the the process as it consume less resources.
3. Reverse AJAX as Comet: Request is sent to the server and kept alive for a long time, until a time-out or a server event occurs. When the request is completed, another long-lived AJAX request is sent to wait for other server events. With Comet, web servers can send the data to the client without having to explicitly request it. The server can push events on the clients by immediately committing (completing) the responses, or it can accumulate them and send bursts.
You can get more information on this #link

I will post an implementation of this on my next post. I hope this will help you to understands the technics.

Amazing Hit Counter Web Service!

Most of the site in today’s world having this kind of features which trace down your visitor’s visits or shows your blog or site’s popularity. “A web counter or hit counter is a computer software program that indicates the number of visitors, or hits, a particular webpage has received. Once set up, these counters will be incremented by one every time the web page is accessed in a web browser.” – According to Wikipedia.

The number is usually displayed, with image or text, as an old inline digital image, a plain text or an old mechanical counter. Image renderization of digits may use a variety of fonts and styles, the classic example is the wheels of an odometer. The counter is often accompanied by the date it was set up or last reset, otherwise it becomes impossible to estimate within what time the number of page loads counted occurred.

Implementation of this is very simple and easy if you are using any kind of web service. All you need to add this source link to your image tag’s src attribute.
http://www.reliablecounter.com/count.php?page=&digit=style/plain//&reloads=
Note:- On e Page attribute, you need to define your website url without http or https. Yu can change look and feel of the counter by placing the attribute value from 1 to 34 and you can make the unique hits per IP by placing reloads attributes as 1.
E.g:http://www.reliablecounter.com/count.php?page=shyamapadabatabyal.wordpress.com&digit=style/plain/1/&reloads=0

I hope this helps. Simple isn’t It!!! 🙂

Add JavaScript mandatory validation and implementation on New Google reCAPTCHA

“reCAPTCHA is a user-dialogue system. Like the CAPTCHA interface, reCAPTCHA asks users to enter words seen in distorted text images onscreen. By presenting two words it both protects websites from bots attempting to access restricted areas and helps digitize the text of books. The reCAPTCHA service supplies subscribing websites with images of words that optical character recognition (OCR) software has been unable to read.” According to Wikipedia.

Recently Google has modified their reCAPTCHA in terms of user accessibility. The only problem with the old version of this, it was hard to understand the captcha code for human to enter and verify the code. So Google recently announced a new application programming interface called No CAPTCHA reCAPTCHA, which simplifies the process of determining if a user is human. With No CAPTCHA reCAPTCHA, users can confirm that they are human by simply clicking on a check box next to the sentence: “I’m not a robot.” No CAPTCHA reCAPTCHA is already integrated with services like WordPress, Snapchat and Humble Bundle. No CAPTCHA ReCAPTCHA may look easy for spammers to crack, but Google developed a sophisticated Advanced Risk Analysis backend to consider the user’s engagement with the CAPTCHA before, during and after determining if the user is human.

Most users should easily be able to move on by clicking on the check box, but suspicious humans or ”bots” will be forced to answer a distorted text puzzle on desktops or an animal matching test on mobile devices.

Implementation of this captcha is as similar and ease as earlier into your site. But while implementing the site currently its hard to make the captcha code mandatory. Yes you can do that but by using your preferred server side language(e.g: PHP) but what about client side validation which we use to perform using jQuery and JavaScript. I have searched for proper solution weither Google provides some kind of parameter to make this as required but I didn’t any solution. So I have prepared one for this #Download-link. Please download this HTML and check the simple JavaScript validation code. You can also use jQuery code for your validation purpose to make this more appropriate.

Live Video Broadcasting Era

What if you can meet your favorite celebrity on internet and can follow his/her life style live! What if you can show your design and portfolio live directly to your interviewer! What if you can get all the classes lesson from your live classroom! Seems impossible? believe me, it possible and technology grows in such a rate thing like days will be very common in coming days by using incredibly techno features what we can call Live Streaming and medium would be video or audio.

According to Wikipedia “Live streaming, which refers to content delivered live over the Internet, requires a form of source media (e.g. a video camera, an audio interface, screen capture software), an encoder to digitize the content, a media publisher, and a content delivery network to distribute and deliver the content”. On this article I will cover Video streaming real-time or you can call it as “Live Streaming”.

Now how can we implement this into your website like platform so that we can use this features to use. In order to implement this kind of functionality you need to setup and configuration RTSP(Real Time Streaming Protocol) into your server which is really time consuming part. Another way would be to use 3rd party services. There are lots of vendors available which provives such kind of features. Ustream is one of them. Ustream provides an easier interface to upload video offline or live video(using your webcam) and can broadcast to the world. It also provides us its powerful APIs to integrate the live broadcasting channels into your websites. In order to implement this, you need follow certain steps:-
1. First, you need to registered into Ustream site and create/upload your channels(containing videos).
2. Now after go to the Dashboard you can create channels and publish your service. For premium users, you can upload direct video for broadcasting and many more.

3. Now, once you have successfully created your channel then get the Stream Key and RTMP URl in order to publish under “Remote” tab.
4. You can access your channel directly like this:-
http://www.ustream.tv/channel/%5Bchannel-name-of-ustream%5D
Example: http://www.ustream.tv/channel/kumarshyama-tv
5. Now if you are ready, then you can share and start “Go Live” for public broadcasting to the world.
6. In order to implement this live video streaming channel into you html web pages, all you need to do is download this zip files.
7. Unzip files and go to directory called “example” and where you will get index.html file. Just open this file into your browser.
8. If you want to embed your video channel into your site just use iframe tags like this:-
http://www.ustream.tv/embed/put-your-channel-id

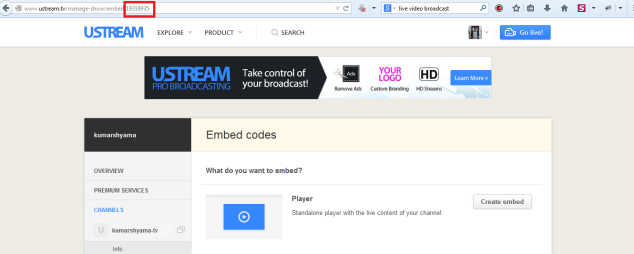
Note: You can get channel id from your ustream account bu clicking on Channel > Embed tab.

That’s all. Enjoy your channel and share your and broadcast yourself to the world LIVE!!!

Ultimate QR code generate API

QR codes are a popular type of two-dimensional barcode. They are also known as hardlinks or physical world hyperlinks. QR Codes store up to 4,296 alphanumeric characters of arbitrary text. This text can be anything, for example URL, contact information, a telephone number, even a poem! QR codes can be read by an optical device with the appropriate software. Such devices range from dedicated QR code readers to mobile phones.

Today in order to generate dynamic QR code is pretty simple. Google has provided us extremely ease in order to generate QR code for your sites. All you need to do is follow these certain steps:-
1. All you need to do is use this parameter for calling a dynamic QR code: https://chart.googleapis.com/chart?chs=300×300&cht=qr&chl=kumarshyama&choe=UTF-8
2. Root URL: https://chart.googleapis.com/chart?
Required Parameters:
cht(Chart Type) = This must always be qr as we are creating QR codes.
chs(Chart Size) = This defines image’s dimension as width x height in pixels.
chl(Chart Letter) = You need to pass character for which you want to display QR code.
choe(Chart of Encode) = This defines encoding format for this QR.
You can get complete idea from this table which has been taken from google documentation site.


3. Now you will have QR code and if you want it to represent into your webpage, then you can call this url under image src attribute. That’s it. Simple wasn’t it? 🙂

Generate barcode using PHP!!!

A barcode is an optical machine-readable representation of data relating to the object to which it is attached. Originally barcodes systematically represented data by varying the widths and spacings of parallel lines, and may be referred to as linear or one-dimensional (1D). Later they evolved into rectangles, dots, hexagons and other geometric patterns in two dimensions (2D). Although 2D systems use a variety of symbols, they are generally referred to as barcodes as well. Barcodes originally were scanned by special optical scanners called barcode readers. Later, scanners and interpretive software became available on devices including desktop printers and smartphones.

In order to generate barcode, its quite simple. Thanks David Scott for his contribution on creating a highly usable library to complete. This script/coding that generates barcodes in four barcode formats including Code 128, Code 39, Code 2of5, and Codabar. With a little over 100 lines of code you have the options of “vertical” or “horizontal” display, varying barcode heights, and one of four barcode formats. It does require the GD Library to be installed as a module in PHP.

In order to implement barcode, please follow these certain steps:-
1. Download this zip code and place it into your server.
2. Unzip this code.
3. You can call the index.html file in order to view barcode(currently barcode is being viewed with name of mine.)
Example URL: http://www.example.com/kumarshyama-barcode/barcode/index.html
4. Output will be an image having barcode on it. You can directly get the bardcode on proper url hitting.
Example: http://www.example.com/kumarshyama-barcode/barcode/barcode.php?text=kumarshyama&size=90
5. You can have different parameter to make this barcode more meaningful. Here are some examples:-
a. http://www.example.com/kumarshyama-barcode/barcode/barcode.php?text=kumarshyama
b. http://www.example.com/kumarshyama-barcode/barcode/barcode.php?text=kumarshyama&size=90
c. http://www.example.com/kumarshyama-barcode/barcode/barcode.php?text=kumarshyama&size=90&codetype=Code39
d. http://www.example.com/kumarshyama-barcode/barcode/barcode.php?text=kumarshyama&size=90&codetype=Code39&orientation=vertical

You can use this url for displaying image into image tag for more representation format. Thats it. Simple isn’t it!!! Happy Coding…

Conflict with Woocommerce Plugin on WordPress Site!!!

Today we have encountered a strange problem on one of my site where suddenly site’s supporting ticket which we have performed lot of customization on purchased plugin stopped working. It was critical as lot of client didn’t submit their support tickets.

After spending some time we have found that this support plugin conflicts with woo-commerce plugin which was introduced on last week. Submit Ticket plugin AJAX’s submission was not working due to JS conflicts. So for this how you can prevent such kind of incident? We have found solution for this. All you need to do is just remove JS and CSS files of woo-commerce plugin which is being called by footer.php file of your theme using wp_footer(). So in such situation, if your some other plugin one certain page showing you hard time(conflicting), then you can de-attach all CSS and JS files of woo-commmewrce plugin for that. You need to write these lines of script under your theme functions.php file

add_action( ‘wp_enqueue_scripts’, ‘child_manage_woocommerce_styles’, 99 );
/**
* Remove WooCommerce Generator tag, styles, and scripts from the homepage.
* Tested and works with WooCommerce 2.0+
*
* @author Greg Rickaby
* @since 2.0.0
*/
function child_manage_woocommerce_styles() {
remove_action( ‘wp_head’, array( $GLOBALS[‘woocommerce’], ‘generator’ ) );
if ( is_front_page() || is_home() ) {
wp_dequeue_style( ‘woocommerce_frontend_styles’ );
wp_dequeue_style( ‘woocommerce_fancybox_styles’ );
wp_dequeue_style( ‘woocommerce_chosen_styles’ );
wp_dequeue_style( ‘woocommerce_prettyPhoto_css’ );
wp_dequeue_script( ‘wc_price_slider’ );
wp_dequeue_script( ‘wc-single-product’ );
wp_dequeue_script( ‘wc-add-to-cart’ );
wp_dequeue_script( ‘wc-cart-fragments’ );
wp_dequeue_script( ‘wc-checkout’ );
wp_dequeue_script( ‘wc-add-to-cart-variation’ );
wp_dequeue_script( ‘wc-single-product’ );
wp_dequeue_script( ‘wc-cart’ );
wp_dequeue_script( ‘wc-chosen’ );
wp_dequeue_script( ‘woocommerce’ );
wp_dequeue_script( ‘prettyPhoto’ );
wp_dequeue_script( ‘prettyPhoto-init’ );
wp_dequeue_script( ‘jquery-blockui’ );
wp_dequeue_script( ‘jquery-placeholder’ );
wp_dequeue_script( ‘fancybox’ );
wp_dequeue_script( ‘jqueryui’ );
}}

The above shown code de-attach JS and CSS of woo-commerce plugin on home page or front page of the site. You can change the defined condition for your required pages by using wordpress based function called “is_page()”

Migration Code into IIS Server

Most of the time, when we migrate our code specially open source based code like Java or PHP we have to face problem in order to set the website live because these languages are pretty much supported on native Apache server without doing any extra server settings. On Apache based server, all websites are calling based upon one file called .htaccess where site’s permalink is being set.

In order to run i.e PHP files into IIS server then we have to create web.config file needs to be present at the root of the site. If your site doesn’t have web.config file at root then please create this file. You can use the following lines of code into that:-

<?xml version=”1.0″ encoding=”UTF-8″?>
<configuration>
<system.webServer>
<defaultDocument enabled=”true”>
<files>
<clear />
<add value=”index.php” />
<add value=”index.aspx” />
<add value=”index.asp” />
<add value=”index.htm” />
<add value=”index.html” />
<add value=”home.asp” />
<add value=”home.htm” />
<add value=”home.html” />
<add value=”default.aspx” />
<add value=”default.asp” />
<add value=”default.htm” />
<add value=”default.html” />
</files>
</defaultDocument>
</system.webServer>
</configuration>

Then place your .htaccess files as well on root so that web.config will help you to reach your homepage/landing of the site but in order to browse other pages, you need .htaccess files with rewrite rules for clear and SEO friendly links/urls.

Fetch country name using IP address

There are several times you may require to trace down IP address and you want to know some background information like from which country this IP has been issued from which state and city and Geo location. There are lots of site which providing this kind of features but what about if you need this type of service into your application such as European nation people can see your application on thier natives and Asian(chiness) can see application on their native language. So how you can track those visitors if your site/application doesn’t have login/signup process. Answer is IP address.

There are lots of free APIs/Web Services available on web, out of which I have found this one is much more easier and more powerful. This service provided name is LocatorHQ.

Implementation part is pretty simple:-
1. Signup/create a free account on the site, so that you can can authorization to access/use their service.
2. After signup,you will get username and API key which will be email to your registered email id.
3. Now all you need to do is call the web service something like this:
http://api.locatorhq.com/?user=&lt;username> &key=<apikey> &ip=118.92.16.247&format=json

Example: http://api.locatorhq.com/?user=Shyamapada1367%20&key=2cc839644de8f2b8b0939636ef90969cc374bbd5&ip=118.92.16.247&format=json

Note: You can retrieve result format as XML and Plain Text as well. After retrieving result you can get information as decoding format from JSON/XML. Simple isn’t it!!! 🙂